There’s a specific kind of motorcycle photograph that most people have never seen done well. The bike is razor sharp. Behind it, the road blurs into a horizontal smear of light and dark — the ghost of its own movement, painted into the frame. The mountains above are a clean, deep blue silhouette. The whole image feels like the bike has just erupted out of speed into stillness.
This is not a Photoshop composite. It’s a single frame, taken on a manual exposure with rear curtain flash sync, during the eighteen-minute window after the sun drops below the horizon. This guide gives you everything you need to execute it.
What Makes This Shot Work
The technique exploits a specific behaviour of rear curtain sync. In standard (front curtain) flash, the flash fires at the start of the exposure — the bike is frozen sharp first, then the shutter stays open and records ambient light in front of the frozen subject. The streak appears to lead the bike. That’s backwards. Unnatural.
Rear curtain sync fires the flash at the end of the exposure. The shutter opens, the bike moves through the frame painting a blur trail behind it, and then — in the final millisecond — both flashes fire and the sensor records a sharp, lit freeze of the bike at the end of its journey. The streak is behind the bike. The motion makes sense.
Combine this with a blue hour sky (deeply underexposed ambient, rich colour in the background) and two carefully positioned flashes, and you get an image that looks nothing like a track photo, nothing like a studio shot. It looks like the road itself.
Gear Required
| Camera | Any mirrorless or DSLR with manual mode |
| Lens | Standard zoom 24–70mm equivalent — set to 35–40mm |
| Trigger | Any wireless flash trigger with rear curtain sync support |
| Flash A — Fill | Any speedlight, nearside, ~1m height |
| Flash B — Rim | Any monolight or powerful speedlight, farside, 2m+ height |
| Tripod | Heavy duty — must be rock-steady for the full exposure |
This guide was shot on a Canon R6 II with Godox AD200 and V860III — any equivalent system will work.
The Setup Diagram
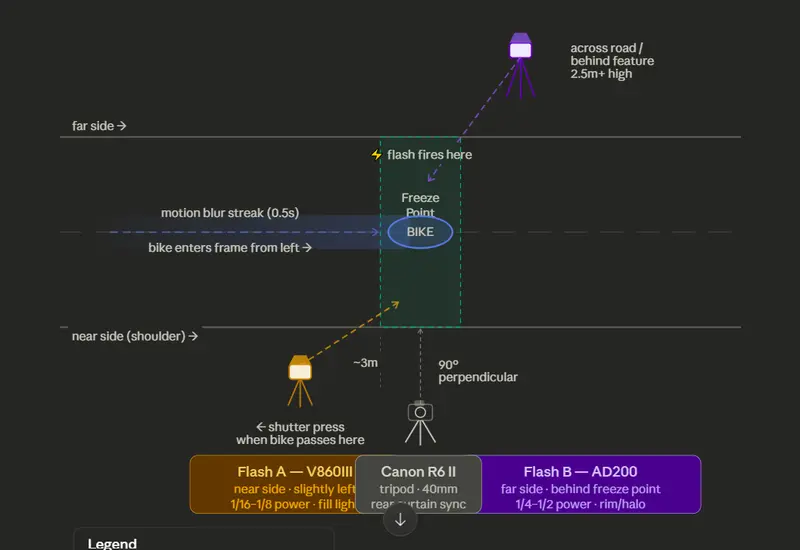
The key positions:
- Camera is perpendicular to the road, 90°. Not angled. This is what creates the horizontal streak rather than a diagonal one.
- Flash B (rim) is placed across the road, farside, at 2.5m+ height, angled back at the bike’s approach. It fires across the rear and side of the bike, creating a rim light that glows through the shot.
- Flash A (fill) is nearside, close to shoulder height (~1m), aimed to provide soft fill across the bike’s near face.
- Freeze point is the centre of your frame — this is where the bike will be when the flashes fire. Pre-focus here. Use a stone, a piece of tape on the road, anything to mark it.
Camera Settings
The core exposure
| Mode | Manual (M) |
| Shutter Speed | 0.5s – 0.8s (adjust to bike speed) |
| Aperture | f/8 – f/11 (sharpness + mountain detail) |
| ISO | 100 — keep it low for a clean background |
| Focus | Manual. Pre-focused on a marker at the freeze point |
| Flash Mode | Rear Curtain Sync (set on your trigger) |
The shutter speed is your primary creative control. Longer shutter = longer streak. At 30 km/h and 0.5s, you’ll get a streak roughly the width of the frame. At 0.8s, it bleeds off the edges — which can look incredible or overwhelming depending on composition. Start at 0.5s and adjust from there.
Why f/8–f/11? You're shooting at blue hour, not in darkness. The background sky still has luminance — you want it rendered as a clean deep blue, not blown out. A narrow aperture controls this while also putting the full length of the bike in sharp focus when the flash fires.
The Blue Hour Window
Blue hour for this shot is specifically 20 minutes after sunset. Not during sunset — the sky is still too bright and you lose the blue. Not 40 minutes after — it’s too dark and the sky goes black.
Execution steps
-
Ambient check first. Take a frame without flash. The mountains should be a deep blue silhouette. The road should be dark but visible. If the sky is still orange or pink, wait.
-
Position Flash B. Place it on the farside with the stand weighted down (road conditions). Aim it to hit the rear and side of the bike as it reaches the centre of frame. This is the light you’ll see first — it determines whether the shot has dimension.
-
Mark the freeze point. Drop something white on the road at the centre of your composition — a stone, a glove, anything. Pre-focus on it. Lock focus. Remove the marker before the rider approaches.
-
The approach. Rider maintains a steady 30 km/h — consistent speed is more important than any other variable. Faster bikes produce shorter-looking streaks (less time in frame). Slower bikes produce longer ones. 30 km/h is the sweet spot for a 0.5s shutter.
-
Press the shutter as the bike enters the frame from the right (or left — your choice of direction). The shutter opens. The bike crosses. Both flashes fire just before close.
-
Review immediately. You have a narrow window. The first shot tells you everything.
Live Troubleshooting
| Problem | Cause | Fix |
|---|---|---|
| Too much blur, bike indistinct | Shutter speed too slow | Decrease to 0.4s, or increase rider speed slightly |
| No blur — looks like a static flash shot | Shutter too fast, or ambient too dark | Slow shutter to 0.6–0.8s, shoot earlier in blue hour window |
| Bike too dark | Flash A (fill) power too low | Increase fill flash power by 1 stop |
| No rim light / bike merges with background | Flash B (rim) too weak or wrong angle | Increase rim flash power. Check aim — it should catch the rear quarter |
| Sky too bright / blown out | Shot too early — sky still too luminous | Wait 5 more minutes. Narrow aperture to f/11 |
| Sharp bike but streak appears in front | Front curtain sync active, not rear | Check trigger sync menu — must be Rear Curtain |
| Flash fires, then fires again (double flash) | Pre-flash from TTL mode triggering early | Switch both flashes to Manual power mode |
Shooting Your Own Bike
If you’re solo — shooting your own motorcycle without a separate rider — this technique is still fully achievable with a few adaptations.
Use a remote shutter release or cable release. Set the shutter to a 2-second delay timer so you have time to step back after pressing. Alternatively, use your camera’s smartphone app via Bluetooth — you can trigger from your phone while standing at the bike’s start position.
The challenge with solo work is maintaining consistent speed. Consider: starting the bike, setting it in motion at idle in 1st gear on a slight incline, and triggering from a position ahead of the frame. The engine at idle will hold a reasonably consistent crawl. This is unconventional but entirely workable for a static camera on a tripod.
The most important thing for solo shooting: mark the freeze point precisely. You won't be watching the bike enter the frame through the viewfinder. You're trusting the bike to arrive at the pre-focused point at the moment you trigger. Mark it clearly and position your camera so that point is dead centre.
What to Expect
Don’t expect perfection on the first frame. This is a timing shot — the relationship between when you press the shutter and where the bike is in the frame when the flashes fire is everything. Budget for 15–20 attempts across the blue hour window.
The blue hour window itself gives you roughly 18–22 minutes before the sky goes fully dark. That’s 15–20 frames at most if you’re cycling efficiently. The window is tight. Have your settings dialled before the sun drops.
The shot that works will be obvious. The combination of the horizontal streak, the sharp flash-lit machine, and the deep blue background creates an image that doesn’t look like anything else in motorcycle photography. That’s the point.
MotoKapture publishes written technique guides for motorcycle photographers working in real-world conditions. Questions: [email protected]